Important! Before the workshop, please download and install the Arduino IDE and add support for Adafruit boards. Follow Adafruit’s excellent tutorial on how to do both of these things.
Tools and Materials Used in Workshop Specific to Wearable Electronics
- Conductive thread
- Iron-on conductive fabric
- Resistive fabric
- Flora microcontroller
- Handmade flex sensor
- Handmade soft switch
- Snaps as electrical and mechanical switches
- Straight pins
- Velcro
- Tailor’s chalk
- Silhouette Cameo used to cut iron-on conductive fabric
Day 1
Discussion + Presentation: 30 mins
– What do the terms “wearables”, “wearable tech”, “wearable electronics”, “soft circuitry”, “e-textile” mean?
– What are common topics and themes explored by this field?
Let’s Build Soft Components!: 2 h 15 mins
Soft circuitry is often found in wearable electronic projects. Learn about conductive threads and fabrics and how to use them to build soft, flexible, and wearable electronic projects.
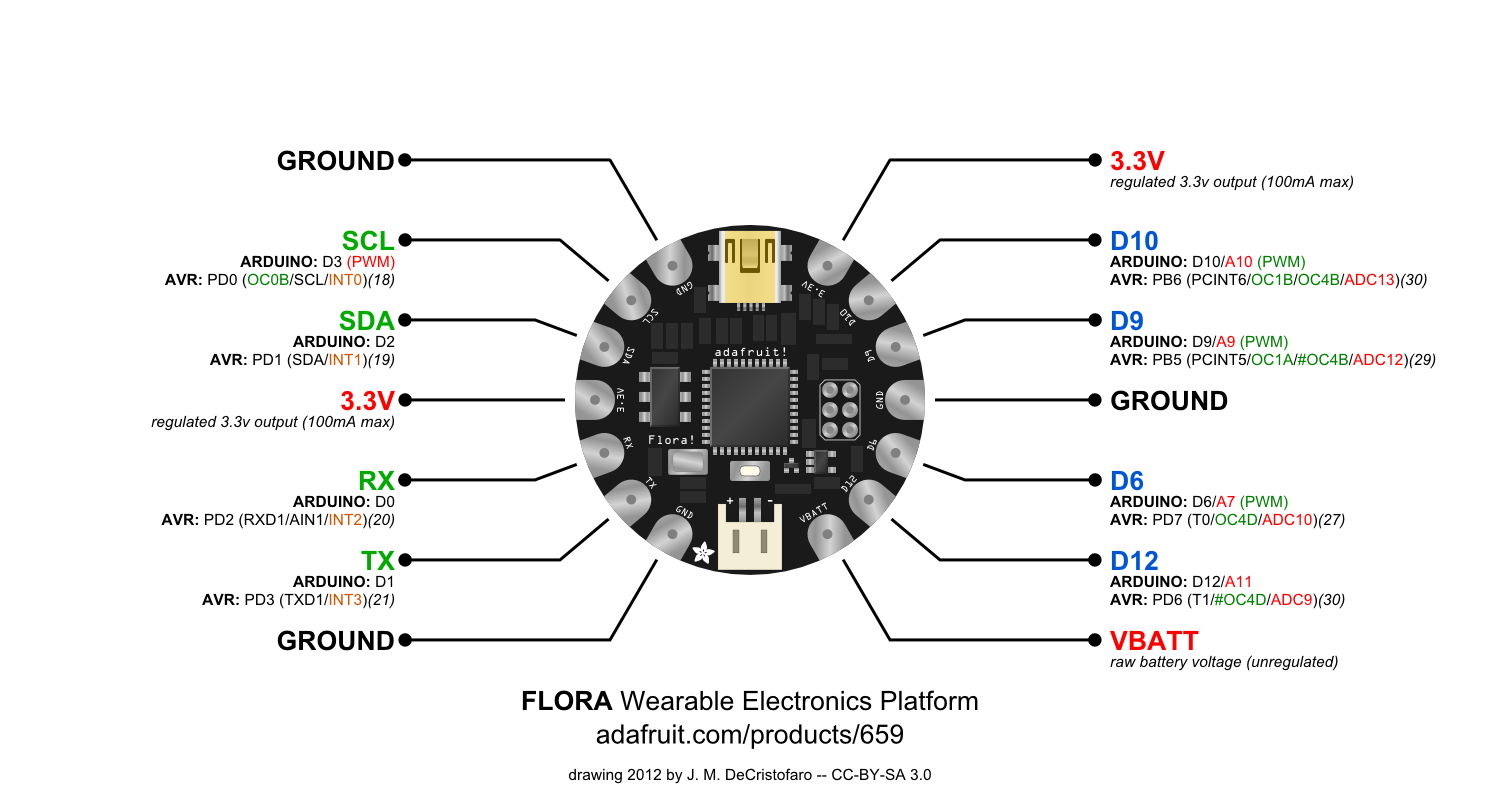
Adafruit Flora: Getting Started
Flora Microcontroller Features
- Onboard power regulator protection diodes and polarized connectors make it difficult to fry a Flora by accidentally connecting too much power.
- Onboard RGB LED for quick start and debugging.
- 1.75″ diameter
- Restart button to reboot system
Tech Specs
- 2 JST connector accepts 3.5V – 9V battery
- Board operates on 3.5V – 5V
- USB HID support
Show and Tell: 15 mins
– Review of components our circuit will use: switches, flex sensor, LEDs, speaker, power, conductors.
Build a Soft Switch!
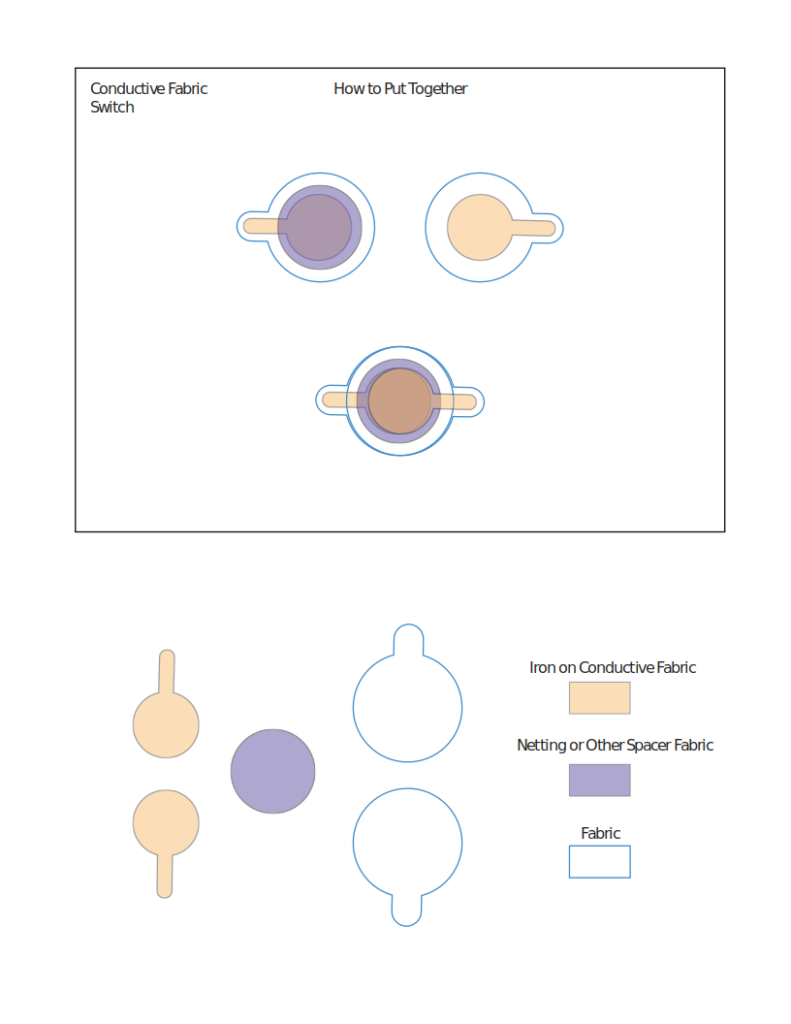
When building your switch you can start to think of what you would want your switch to activate. Do you want your switch to be on a t-shirt? Do you want it to strap to the bottom of your foot or around your hand?
You can create the switch for an action or make a momentary soft switch using the provided printed pattern.
Soft Switch and LED!
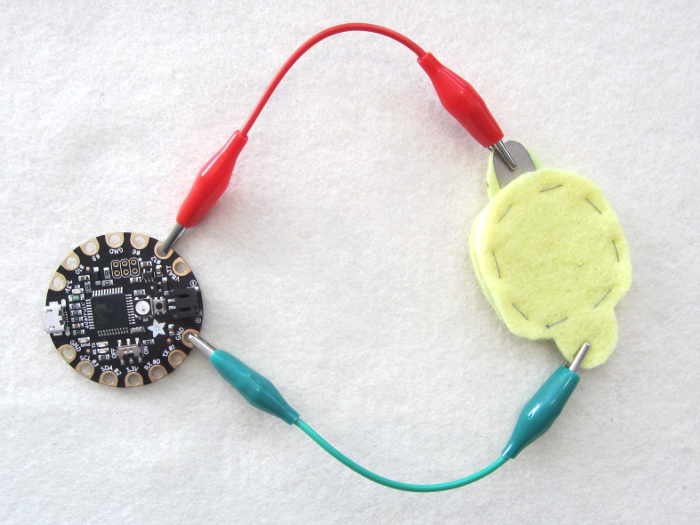
Connect the soft switch to the Flora
Switch –> ground (-) Flora
Switch –> pin 12 Flora
Open Arduino IDE and plug-in Flora. Before you can upload a sketch to the board, you need to do two things:
1) Choose what board you are using.
In the software navigate to:
Tools > Board > Flora
2) Choose what port to communicate through.
In the software navigate to:
Mac
Tools > Port > /dev/cu.usbmodemXXXX
Windows
Tools > Port > COM X
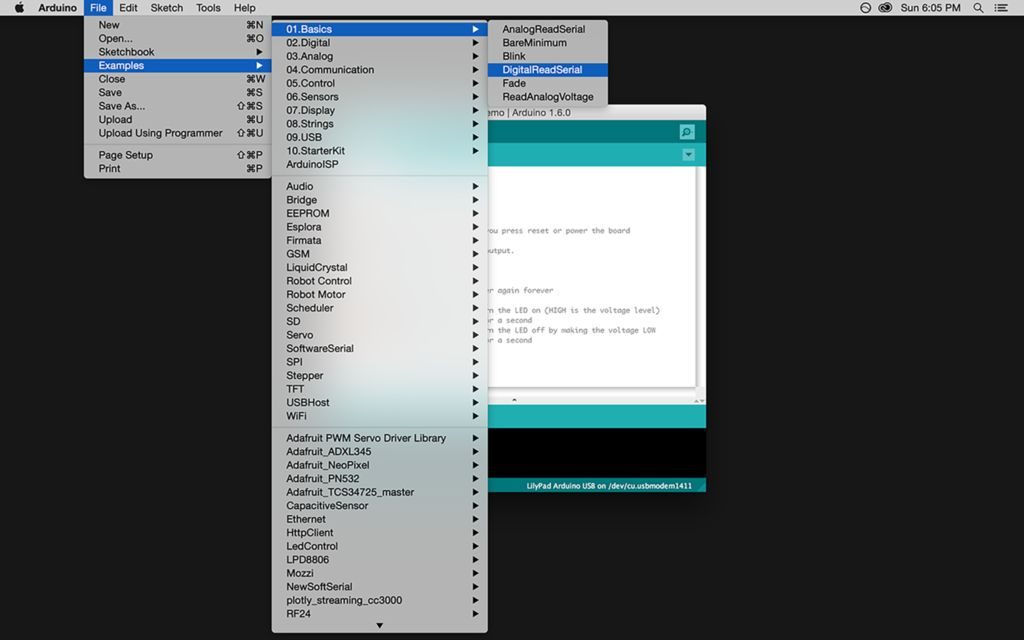
Open Sketch
Navigate to:
File > Examples > Basics > DigitalReadSerial
Copy and paste the example sketch in a new window and save as DigitalReadDemo.
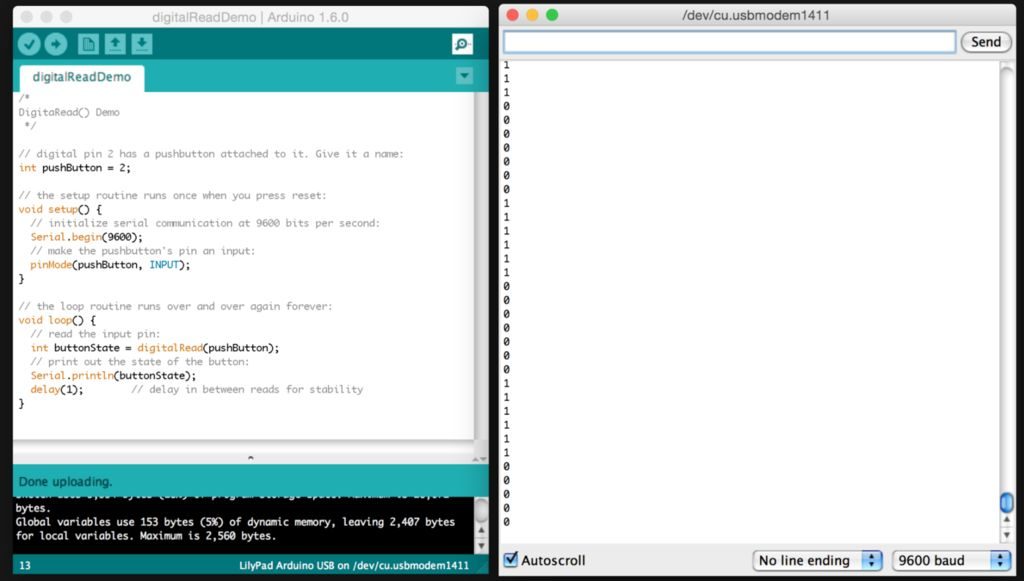
Upload the sketch by hitting the upload button. There is not an LED in this circuit that can tell whether or not the switch is doing what it’s supposed to; all the action is happening on board. So, how do you know your switch is open and closing? You can read the results in the serial monitor!
The Arduino environment has a built-in feature that allows you to see if your switches and sensors are working. This feature is the serial monitor. It displays what is being communicated through the serial port. The serial port is a virtual port that allows data to flow in between the computer and your board through the USB cable.
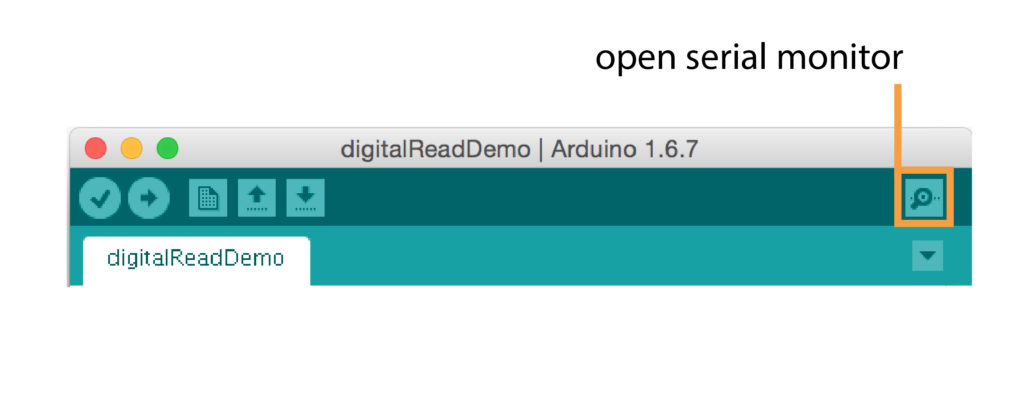
The DigitalReadDemo sketch reads the signal coming in from the digital pin your switch is connected to. Remember, a digital signal will either give you a 1 or 0. This 1 or 0 will be printed in the serial monitor for you to see. We will go over how it prints to the serial monitor a little later in this lesson. To open the serial monitor, click the button that has what looks like a magnifying glass in the upper-right hand corner of the sketch window in the Arduino IDE.
When opened, there should be a string of 0s and 1s printing. Press the switch and see if anything happens. If a 0 isn’t already there, one will pop up. Do you notice anything about the behavior of the switch and the prints in the monitor? It’s hard to actually see a relationship between your press and when it prints a 0 or 1. Your goal is to get a clear 0 or 1 printing in the window when the switch is open and the opposite printing when it is closed. Why isn’t this happening?
This is happening because what you have now is a floating pin. When the switch is closed the switch lead connected to ground is referenced which is why you get a 0. When the switch is open, the pin doesn’t know what to reference because it’s not connected to ground or power. So, how do we give it a reference?
The answer is a pull-up or pull-down resistor.
Add a Pull-down Resistor
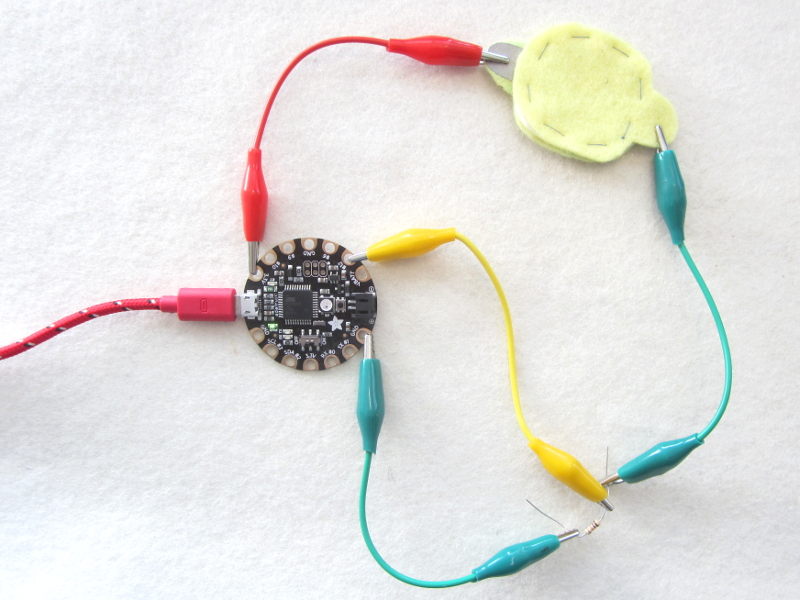
Grab a 10K Ohm resistor and connect it to the switch and board as shown.
When a resistor with a value of 10K ohm or higher is connected between the input pin and ground, it pulls the pin down to 0 volts when the switch is open. When pulled LOW to ground (0 volts), the input pin reads 0.
Enable Pull-up Resistor
There is a second way to fix a floating pin that does not require you to hook up an extra resistor in your circuit.
Remove the 10k Ohm resistor and connect the switch back to ground:
Switch –> ground (-)
Switch –> pin 12
The Flora microcontroller and most Arduino boards already have resistors connected to some pins. These are called the board’s internal pull-up resistors. They are called pull-up instead of pull-down because instead of them being connected to ground (0V), they are connected to power (3.3V) pulling it up to a positive voltage value. Using them really helps to minimize the amount of hardware you need to deal with. Instead of adding an external resistor to the circuit, the internal pull-ups are enabled through software in the Arduino sketch.
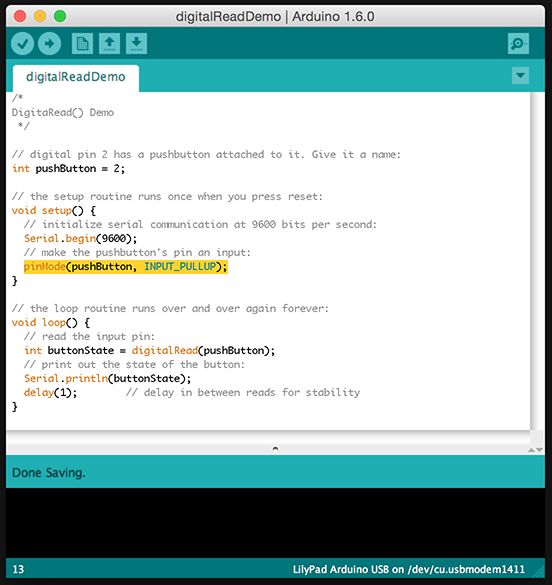
To enable the internal pull-ups via software, simply add _PULLUP to the INPUT argument in the pinMode() function in your sketch:
pinMode(pushButton, INPUT_PULLUP);
Open up your serial monitor again and check the output.
Add an LED!
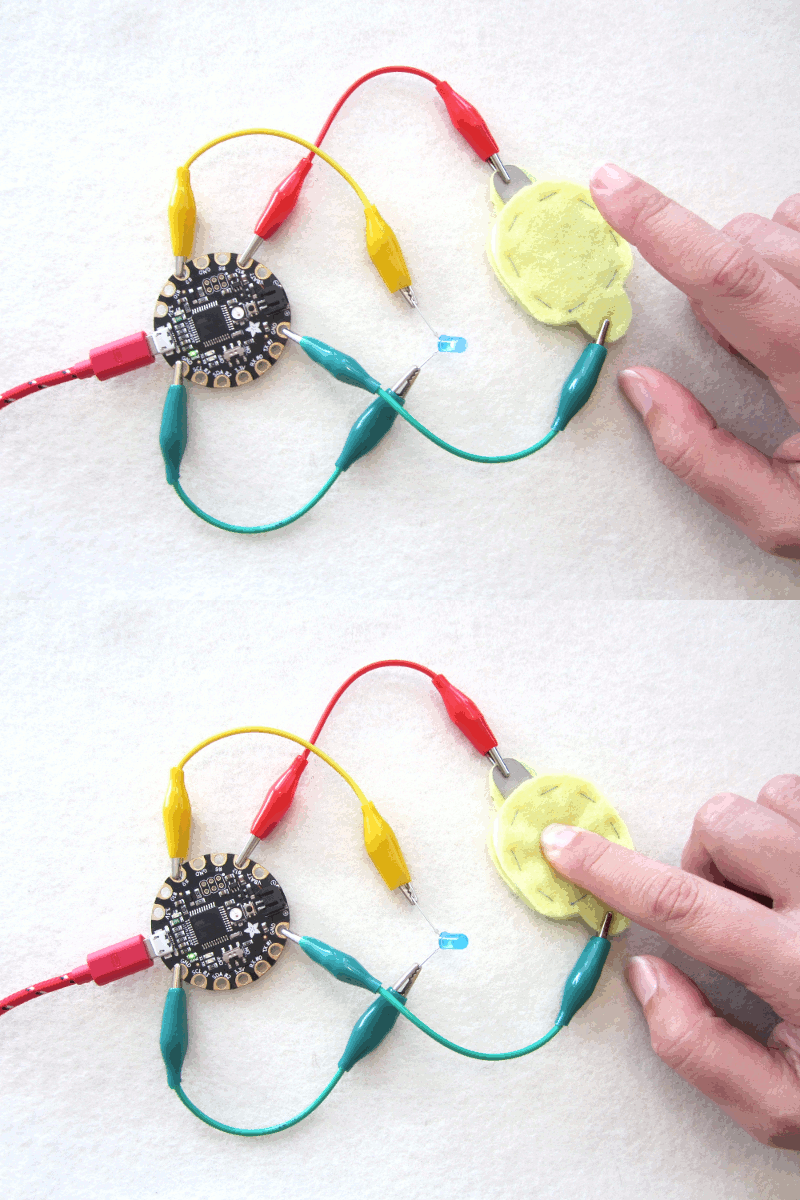
Actuate an LED with your switch.
LED power (+) –> pin 9
LED ground (-) –> ground (-)
In the Arduino IDE Navigate to:
Examples > Digital > Button
Copy and paste the example sketch in a new window and save as buttonLEDdemo.
Plug in the pin number of your LED and switch and enable the pull-up resistor for your switch.
const int buttonPin = 2;
const int ledPin =  3;
pinMode(buttonPin, INPUT_PULLUP);
In this example sketch, there is no serial port set up, so you need to add this line between the curly brackets of the setup() function.
Serial.begin(9600);
Upload sketch. The LED will be on when the switch is open and off when the switch is closed.
What do you change to make the LED start off and come on when the switch is closed instead?
Play a Tone!
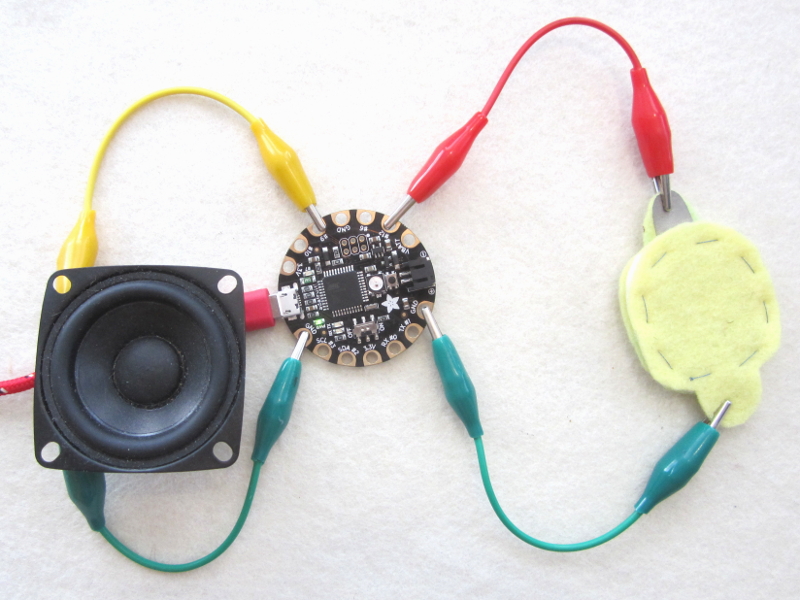
Connect a speaker to the Flora.
Speaker power (+) –> pin 9
Speaker ground (-) –> ground (-)
Open a new sketch in the Arduino IDE.
We are going to add a file to our sketch that our program will reference called pitches.h. To do this click the downward pointing triangle in the upper right corner of the sketch window. Choose “new tab” and name it “pitches.h”. Cut and paste this into the pitches.h tab:
/*************************************************
 * Public Constants
 *************************************************/

#define NOTE_B0  31
#define NOTE_C1  33
#define NOTE_CS1 35
#define NOTE_D1  37
#define NOTE_DS1 39
#define NOTE_E1  41
#define NOTE_F1  44
#define NOTE_FS1 46
#define NOTE_G1  49
#define NOTE_GS1 52
#define NOTE_A1  55
#define NOTE_AS1 58
#define NOTE_B1  62
#define NOTE_C2  65
#define NOTE_CS2 69
#define NOTE_D2  73
#define NOTE_DS2 78
#define NOTE_E2  82
#define NOTE_F2  87
#define NOTE_FS2 93
#define NOTE_G2  98
#define NOTE_GS2 104
#define NOTE_A2  110
#define NOTE_AS2 117
#define NOTE_B2  123
#define NOTE_C3  131
#define NOTE_CS3 139
#define NOTE_D3  147
#define NOTE_DS3 156
#define NOTE_E3  165
#define NOTE_F3  175
#define NOTE_FS3 185
#define NOTE_G3  196
#define NOTE_GS3 208
#define NOTE_A3  220
#define NOTE_AS3 233
#define NOTE_B3  247
#define NOTE_C4  262
#define NOTE_CS4 277
#define NOTE_D4  294
#define NOTE_DS4 311
#define NOTE_E4  330
#define NOTE_F4  349
#define NOTE_FS4 370
#define NOTE_G4  392
#define NOTE_GS4 415
#define NOTE_A4  440
#define NOTE_AS4 466
#define NOTE_B4  494
#define NOTE_C5  523
#define NOTE_CS5 554
#define NOTE_D5  587
#define NOTE_DS5 622
#define NOTE_E5  659
#define NOTE_F5  698
#define NOTE_FS5 740
#define NOTE_G5  784
#define NOTE_GS5 831
#define NOTE_A5  880
#define NOTE_AS5 932
#define NOTE_B5  988
#define NOTE_C6  1047
#define NOTE_CS6 1109
#define NOTE_D6  1175
#define NOTE_DS6 1245
#define NOTE_E6  1319
#define NOTE_F6  1397
#define NOTE_FS6 1480
#define NOTE_G6  1568
#define NOTE_GS6 1661
#define NOTE_A6  1760
#define NOTE_AS6 1865
#define NOTE_B6  1976
#define NOTE_C7  2093
#define NOTE_CS7 2217
#define NOTE_D7  2349
#define NOTE_DS7 2489
#define NOTE_E7  2637
#define NOTE_F7  2794
#define NOTE_FS7 2960
#define NOTE_G7  3136
#define NOTE_GS7 3322
#define NOTE_A7  3520
#define NOTE_AS7 3729
#define NOTE_B7  3951
#define NOTE_C8  4186
#define NOTE_CS8 4435
#define NOTE_D8  4699
#define NOTE_DS8 4978
Save your sketch. Cut and paste this into the sketch’s main tab:
/*
 One tone, one button.
*/

#include "pitches.h"

const int buttonPin = 12; // the number of the pushbutton pin
const int speakerPin = 9; // the number of the speaker pin
int note = NOTE_C4; // define note sound

// variables will change:
int buttonState = 0; // variable for reading the pushbutton status

void setup() {
  // initialize the pushbutton pin as an input:
  pinMode(buttonPin, INPUT_PULLUP);
}

void loop() {
  // read the state of the pushbutton value:
  buttonState = digitalRead(buttonPin);
  Serial.println(buttonState);

  // check if the pushbutton is pressed.
  // if it is, the buttonState is HIGH:
  if (buttonState == LOW) {
    // play note
    tone(speakerPin, note);
  }
  else {
    //turn off sound
    noTone(speakerPin);
  }
}
Double check your pin numbers and upload.
A note will play when you close the switch. How do you change note being played?
Build a Flex Sensor!
The Flex Sensor
Remember the resistor you used to restrict current flow in your sewn circuit? The resistor used in that circuit has a fixed value of resistance that does not change. If current runs through a 47 ohm resistor it will always resist 47 ohms (+/- 5%).
A flex sensor is a kind of sensor where the resistance changes value. In other words, when current is running through it and you bend it the amount of current it resists changes. This gives you a range of values. When the flex sensor is connected to a microcontroller this range of values can be read and used as a way to sense that bending action.
Read Changing Resistance on Multimeter
Grab some alligator leads and connect the flex sensor to the red and black probes much like how you connected a fixed sensor to it. The metal leads on the flex sensor are very close together so it may be tricky at first but you will get it eventually!
Turn the dial to 200k or any number larger than 20k on your multimeter. A number should pop up on the display screen and tell you that the flex sensor is 10k (or another resistance if you bought a different sensor than the recommended one). Bend the sensor and watch the numbers go up to about 25k. The sensor is changing based on your movements!


The Handmade Flex Sensor
Take a good look at the flex sensor. It is a strip of flexible plastic that has a black and metallic design along the length of it. The black is a resistive material and the metallic part is a conductive material. This combination of resistive and conductive material is what makes its resistance change when bent. You can buy conductive and resistive materials that, when put together in the right way, can also make a flex sensor.
The materials you are going to use to make your sensor are conductive fabric and a resistive plastic called Velostat. Velostat changes resistance when force is applied, so it works as a flex sensor but it also works like a force sensing resistor (FSR) which is another resistive sensor. What’s cool about a handmade sensor is that you can cut it into any shape you like. They also tend to be a bit more sensitive depending on how it’s made.
There is a great instructable on how to make a flex (AKA bend) sensor by Plusea. Head over there and check out her method of making one. You can use any of the techniques and materials she uses to make yours for this class. I will also show you a way to make one in the next steps using the class materials.
Let’s make a flex sensor!
Cut Velostat
A pattern for a bend sensor is included in the files for this lesson. Use this pattern to cut out all the necessary pieces for your flex sensor. Or, you can design one that is a different shape and size. I will go over step-by-step how to make one without a pattern.
Use a ballpoint pen to draw a rectangle onto the Velostat. This is the pressure-resistive part of your sensor. Once drawn, cut it out using craft scissors.
Cut Conductive Fabric
You will use conductive fabric to read the changing resistance while electricity is flowing through the plastic. These are similar to the contact design you cut and used for the Hi-5 Collector’s soft switch.
Here is the important part – make sure the conductive fabric contacts are small enough to be completely covered by the Velostat. If the contacts touch it will create a short and the electricity will not go through the resistive plastic. You will end up with a soft switch instead of a resistive sensor!
Once you cut out your contacts with leads put them on top of the Velostat and make sure the edges are covered. The lead will poke out of the side which is good.
Cut Casing and Iron
Place a conductive contact and the resistive rectangle on top of a piece of felt. With your fabric marker draw around the edges leaving a border of at least 1/8″.

Cut out two casings from the felt using the same pattern. Place the conductive contacts on top and iron down.

Sandwich and Sew
Put the Velostat in between the conductive fabric.


Thread a needle with about 18″ of regular thread. Use a running stitch to sew all around the edge of the sensor. Get close to the edge of the Velostat inside but try to avoid piercing through it with your needle. Skip over each conductive fabric lead with the thread rather than sew through it.


Test
Your sensor is done! Time to test it. Connect your handmade sensor to the multimeter. Flip the dial until you get a reading. If you used the provided pattern the resistance of the sensor while it’s lying still will be around 1.5k ohms. Press and bend the sensor and watch the resistance go down!
Let the sensor rest and it will rise in resistance to its maximum. Write down this max resistance, you will use it in the next step. My max reading when it is still is 1,200 (1.2k) ohms.

Troubleshooting
The multimeter reads 0.
The metal contacts are touching and creating a short. To double-check turn the multimeter to the continuity setting while the sensor is connected to it. If it beeps you have a short and need to open up the sensor and fix the placement of the Velostat so it covers the two contacts or replace it with a larger piece.
Reading Varying Voltage With a Microcontroller
So, how do you get the range of values you see on the multimeter read by a microcontroller? A microcontroller can not read the changing resistance very well like the multimeter, but it can read changing voltage nicely. To translate this range of resistance to a range of voltage a simple circuit is used: a voltage divider circuit.
What is a Voltage Divider Circuit?
To have a microcontroller read a resistive sensor, like your flex sensor, you need a voltage divider circuit. The circuit consists of two resistors. These two resistors can either be two fixed, two variable or one variable and one fixed resistor.
The circuit we are building is the latter with one fixed (like the one you used for the sewn circuit) and one variable resistor you would like to read (the flex sensor!). You run electricity through the two resistors and take a reading from the point where the two resistors meet. When the sensor changes resistance the voltage coming from the middle point, labeled “Voltage Out” in the diagram, changes. Below is the voltage divider circuit using schematic symbols. In this diagram R1 is the fixed resistor and R2 is your sensor (variable resistor).

The value of the fixed resistor (R1) in the circuit is important because it will determine the range of voltage coming out from the “Voltage Out” point.
Choosing Your Fixed Resistor
There are many values of resistors to choose from. R2 represents our sensor in the above diagram. How do we know what value resistor R1 should be? The value of R1 will determine the range of voltage that gets read by the microcontroller, so you shouldn’t choose just any value. To get the value that is best for your sensor there is a general rule of thumb to go by. This rule is easy to remember and will ensure you get a nice large range of voltage to work with.
+ Take the max resistance of your sensor and divide it by half. This is the value of your fixed resistor.
For example, the max resistance I measured my sensor at was 1.2k ohms. I divide that by 2 to get the value of the fixed resistor.
1,200 / 2 = 600 ohms
I round up from 600 and will use a 680 ohm resistor for my voltage divider circuit. Divide the max resistance you previously recorded by two and round up to the nearest resistor value you have in your kit. What did you get?
Want to know the math behind this circuit and how it works? I won’t get into it here instead, head over to Sparkfun’s Voltage Dividers page to learn more and make sure to check out their nifty voltage divider calculator.
Putting it all Together
Ok, so now we have our fixed resistor value which is R1 in the diagram and we have our sensor which is R2. What about the rest of the diagram? What gets connected to what on the Flora microcontroller?
Below you can see how the above diagram is applied using your two resistors and the microcontroller. The “Ground” translates to the ground on your Flora, the “Voltage In” is the 3.3V coming from the power (+) pin on the Flora and the “Voltage Out” gets connected to an analog input pin so the board can read it changing. The “Voltage In” gets divided so the “Voltage Out” will always be smaller than the “Voltage In”.
Great job getting through this! Now, let’s get hands-on and see how this works.

Read Sensor’s Values and Brighten LED
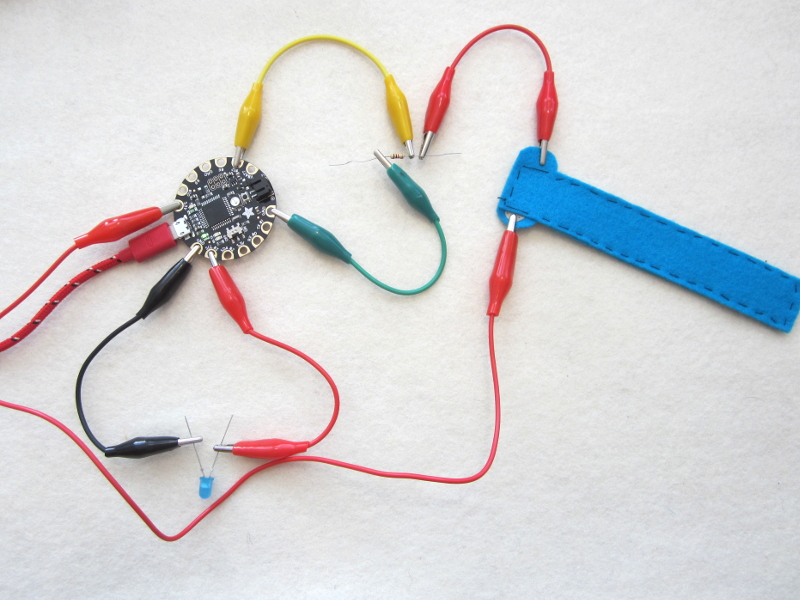
Connect the sensor to the Flora.
flex sensor –> power (+)
flex sensor –> resistor
resistor (same side the flex is connected to) –> pin 12 (analog 11)
resistor –> ground (-)
LED power (+) –> pin 0 (PWM)
LED ground (-) –> ground
In Arduino navigate to:
File > Examples > Analog > AnalogInOutSerial
Copy, paste and save sketch as flexLED.
Change the pin numbers in the first two lines of code.
analogInPin is the pin your sensor is connected to.
analogOutPin is the pin your LED is connected to.
const int analogInPin = A2;
const int analogOutPin = 3;
Upload sketch and bend the sensor to change the LED’s brightness.
Get Max and Min
Open the serial monitor to see the sensor’s values.

Min
Take a look at the numbers next to “sensor =”. When the sensor is resting record the number you see here. The number will change constantly so record the one you see the most and round up to the nearest ten.
Max
Now, bend or press it to the maximum amount and round down that number to the nearest ten.
Plug these numbers, into the map() function map them to the LEDs output values of 0 – 255.
outputValue = map(sensorValue, 0, 1023, 0, 255);
Upload the sketch again. The LED will now have a larger fade range because it is calibrated to your sensor. If your LED flickers it means that you should raise or lower your minimum and maximum. For example, if your sensor drops below the minimum you put in the sketch the board will give the LED full voltage and it will get very bright. You can also see this happen in the serial monitor, the values next to “output =” will become negative. If this happens lower the minimum in your sketch.
Change Pitch of Note
Connect a speaker to the Flora and keep the sensor connected.
flex sensor –> power (+)
flex sensor –> resistor
resistor (same side the flex is connected to) –> pin 12 (analog 11)
resistor –> ground (-)
Speaker power (+) –> pin 9
Speaker ground (-) –> ground
In Arduino navigate to:
File > Examples > Analog > tonePitchFollower
Copy, paste and save sketch as flexPitch.
Change your analog pin, your min and max values, and speaker pin.
int sensorReading = analogRead(A11);
int thisPitch = map(sensorReading, 150, 1010, 120, 1500);
tone(9, thisPitch);
Wrap-up: 15 mins
Next class, we will put this circuit on the body! Think of where you would want to place your sensor, switch and what output you would like to control: light or sound. When conceptualizing your project, LEDs are a great placeholder for more complicated components and actions. It’s encouraged to imagine what the LED could represent. For example, turning on a motor, opening a door, beaming a signal to a satellite, anything! Get weird! If you would like to explore the potential of controlling another kind of output that is accessible in the lab, feel free to discuss with me in prep for the next class.
Day 2
Discussion + Demo: 30 mins
– Intro to prototyping wearable electronics practices (velcro, straight pins, strain relief)
Ideate + Experiment: 2 h
Prototype on Body: 30 mins
Head over to a Reading Body Movements tutorial I wrote up to guide us.
Break up into teams to help you with your brainstorming.
– Experiment with pins and velcro placing the switch and sensor on different parts of the body to activate them.
– Record findings and decide where your circuit will live.
– Share out, where and what are you building?: 15 mins
Build Circuit on Body: 1 h 30 mins
Head over to a Transfer Circuit to Fabric tutorial I wrote to guide us.
– Draw out your circuit on fabric
– Cut traces, plan for conductive thread
– Sew down components
What is a short circuit?
A short circuit is the failure of electricity to flow properly in a circuit because a connection is accidentally made between two points. Current flows down the path of least resistance. If this connection has a lower resistance than the intended path, the current will take it, creating a short.
A circuit sewn with conductive thread is prone to short circuits because of the hairy nature of the thread. Short circuits can also be accidentally made when a trace continues to the next trace, bypassing a component, instead of being knotted and cut. By knowing what short circuits look like, you can avoid them, but sometimes a thread becomes loose and touches a part of the circuit nearby. For hard to see shorts, you will learn how to test for short circuits later in this lesson.

Incorrect – A loose end of conductive thread is coming from the bottom (ground/-) and is touching the top (power/+). The current will not pass through the LED. Instead, it will take the path of lower resistance through the conductive thread.

Correct – This is an LED with no short circuit occurring between power (+) and ground (-).

Incorrect – A short created by forgetting to end one trace and begin a new one. This continuing stitch line connects two sides of a component together. The current will not pass through the component. Instead, it will take the path of lower resistance through the conductive thread.

Correct – One trace ends and another separate trace begins on the opposite side of a component. The current will then pass through the component instead of taking a shortcut on the path of lower resistance.
Poor Electrical Connections
The second thing that usually gets beginners is making a poor connection. This is done by sewing a connection that is loopy and loose. A loose connection can disconnect as the fabric and components move around breaking the flow of electricity. Stitches need to be kept small and tight. Make several stitches through a component and the fabric to make a strong electrical connection.

Incorrect – Loopy and loose connection and trace stitches. This connection will sporadically break while the circuit is moved around.

Correct – Tight and small stitches make good connections and a neat stitch line.
– Test connections with a multimeter as you go!
Reflection: 30 mins
– Record how would you improve the circuit. What would be the steps in this prototype?
